How to Use ExpressVPN on Apple TV — Quick Setup in 2025

You can’t directly install or download ExpressVPN on an Apple TV device (tvOS). So, using and setting up ExpressVPN on Apple TV might seem challenging.
My step-by-step guide helps you install ExpressVPN on Apple TV within minutes. There are multiple ExpressVPN Apple TV setup methods you can use. Overall, the easiest option is to install ExpressVPN on a router.
Quick Guide: How to Use ExpressVPN on Apple TV in 3 Easy Steps
- Choose one of the setup methods.
ExpressVPN Apple TV setup is possible through a router, MediaStreamer, PC, or AirPlay. I recommend installing the VPN on your WiFi router, as it’s the easiest way. Just make sure your router is VPN compatible. - Start using ExpressVPN on Apple TV.
Connect to a server and restart your Apple TV. You’re all set up for safely streaming your favorite shows without compromising your speeds.
How to Install ExpressVPN on Apple TV
ExpressVPN Apple TV setup isn’t as challenging if you follow the steps below. There are multiple methods to use ExpressVPN on Apple TV. Just go ahead and choose the best one for you.
The VPN is compatible with many Apple TV generations, such as:
- 2nd generation Apple TV 4K
- 1st generation Apple TV 4K
- HD (4th gen) Apple TV
- 3rd generation Apple TV
- 2nd generation Apple TV
- 1st generation Apple TV
Also, make sure to subscribe first — choose the option suited to your needs before downloading the firmware.
1. Set Up ExpressVPN on Apple TV Using a Router
Using ExpressVPN on Apple TV through a router is the best option for a permanent and secure connection. This way, you protect all your devices connected to your home WiFi network (like your PCs, smart TVs, and game consoles).
Downloading and installing ExpressVPN on a router takes around 10 minutes. Here’s a list of the routers that ExpressVPN supports:
- Asus — RT-AC56(U/R/S), RT-AC68U (up to v3), RT-AC87U
- Linksys — EA6200, WRT1200AC, WRT1900AC(S), WRT3200ACM, WRT32X
- Netgear — R6300v2, R6400v2, Nighthawk R6700v3, Nighthawk R7000, Nighthawk R7000P
For Netgear Routers
Step 1: Log in to your ExpressVPN account and go to Set Up Devices.
Step 2: Tap on “Router” and select your model from the list.
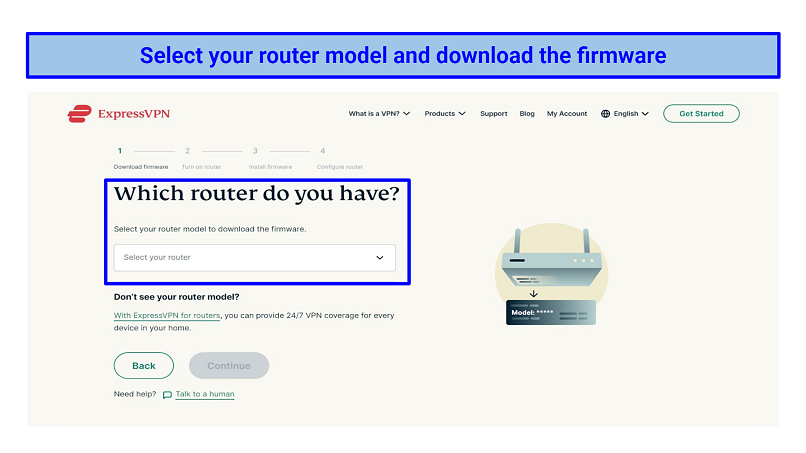 ExpressVPN offers firmware for several routers — Asus, Linksys, and Netgear
Step 3: Download the firmware and copy the activation code.
Step 4: Turn on your Netgear router and connect to the internet.
Step 5: Type “192.168.0.1”, “192.168.1.1”, or “routerlogin.net” into the search engine.
 You can log in to your router’s dashboard using the default username and password
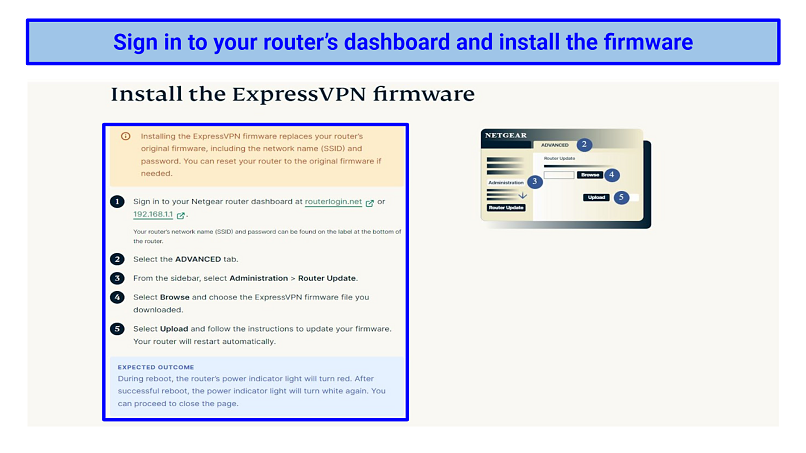
Step 6: Log in with your username and password and go to the Advanced tab.
Step 7: Select Administration > Router Update and browse for ExpressVPN’s firmware.chk file.
Step 8: Click on Upload — your router should restart automatically.
Step 9: Connect your PC to the VPN router. Then, head to the ExpressVPN router page and select Get Started to complete the setup by following the on-screen instructions.
 After filling in your router’s network name and password, ExpressVPN is successfully configured on your router
Step 10: Connect to a server that allows you to safely access the content you want and use your Apple TV privately with ExpressVPN.
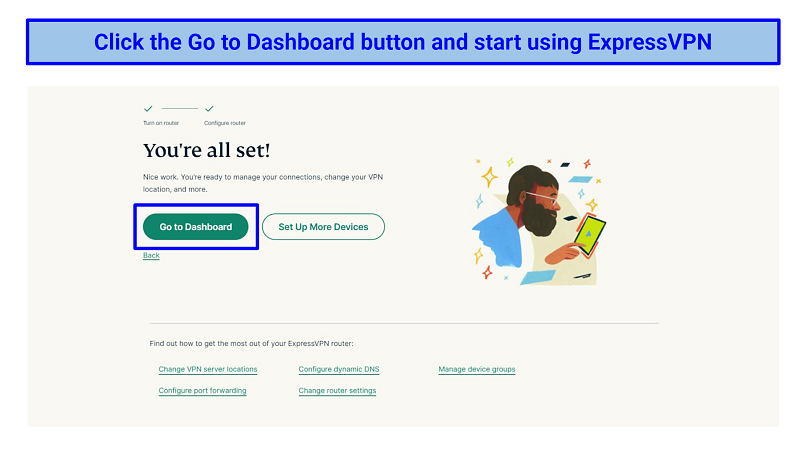 ExpressVPN dashboard allows you to change servers with a single click
For Linksys Routers
Step 1: Log in to your ExpressVPN account and go to Set Up Devices.
Step 2: Tap on the “Router” and select your model from the list.
Step 3: Download the firmware and copy the activation code.
Step 4: Log in to your router admin panel on the Linksys sign-in page and enter the credentials.
Step 5: Click the Connectivity tab, go to Router Firmware Update, and select Manual.
Step 6: Flash the ExpressVPN firmware you downloaded, click the Start button, and let your router restart.
Step 7: You need to connect to your router’s WiFi and then visit the ExpressVPN router page.
Step 8: Set up ExpressVPN on your router and paste the activation code you received.
Step 9: Finally, choose a server location and press the Connect button.
For Asus Routers
Step 1: Open your Asus router’s admin panel by entering the router’s IP address (192.168.1.1) in your browser. Now, enter the username and password.
Step 2: Click on “VPN” under the advanced settings.
Step 3: Select the OpenVPN section and enter the following details:
- Description (copy from your ExpressVPN dashboard)
- Username (copy from your ExpressVPN dashboard)
- Password (copy from your ExpressVPN dashboard)
Step 4: Upload the.ovpn configuration file you got from ExpressVPN and click OK to add the VPN profile.
Step 5: Click Activate, then check your IP address and location to ensure the VPN is working.
For TP-Link Routers
Step 1: Log in using your account information to set up ExpressVPN on your router. Ensure the username, password, and server address details are ready, as those will be used later.
Step 2: Click the Setup ExpressVPN tab and select Manual config. Enter your router’s admin panel URL in your Apple TV browser to enter the settings page.
Step 3: Click the Advanced TP-link settings and navigate to Network > Internet.
Step 4: In the Internet Connection section, enter the username, password, and VPN server address.
Step 5: Finally, set the Connection Mode to Manually and connect to a server.
2. Set Up ExpressVPN on Apple TV Using MediaStreamer
Using MediaStreamer is another method to set up ExpressVPN on your Apple TV. However, MediaStreamer is a DNS service, so you don’t get the security benefits of a VPN.
There are 2 ways to use ExpressVPN on Apple TV through MediaStreamer. It depends on whether you have a static or a dynamic IP address. A static VPN IP address is always the same. A dynamic VPN IP address changes every time you start a new session.
Set Up MediaStreamer on Your Apple TV With a Static IP Address
Step 1: Visit the ExpressVPN DNS settings page — it requires logging in to your account.
Step 2: Click the Register my IP address button and toggle on Automatically register my IP address.
Step 3: Head to the Dashboard and find the Set Up Your Devices section.
Step 4: Select Apple TV — the DNS server IP address should be displayed.
Step 5: Turn on your Apple TV and go to the settings.
Step 6: Now, select Network > WiFi > Configure DNS.
Step 7: Click the Manual button and enter the MediaStreamer DNS IP address.
Step 8: Restart your Apple TV and enjoy safe access to your streaming apps like Apple TV BBC iPlayer, Netflix US, and HBO Max.
Set Up MediaStreamer on Your Apple TV With a Dynamic IP Address
To set up MediaStreamer on your Apple TV with a dynamic IP Address, you need to create a DDNS hostname, register it with ExpressVPN, and configure DNS on your Apple TV.
Create a DDNS Hostname
Step 1: For setting up a DDNS hostname, it's recommended to use the free Dynu service (you can use another DDNS service provider too).
Step 2: Visit dynu.com and create an account.
Step 3: Fill in the form with the necessary information and check your email — open the attached link to verify your account.
Step 4: Log in to your Dynu account using your username and password.
Step 5: Click on DDNS Services > Add > Use Our Domain Name (you can set up your own domain as well if you’re a more tech-savvy user).
 Option 2 allows you to enter your existing domain in the Domain Name box
Step 6: Create your hostname and click the green Add button.
Step 7: Uncheck Wildcard IPv4 Alias, Wildcard IPv6 Alias, and Enable IPv6 Address, then click the Save button — your Dynu account is set up.
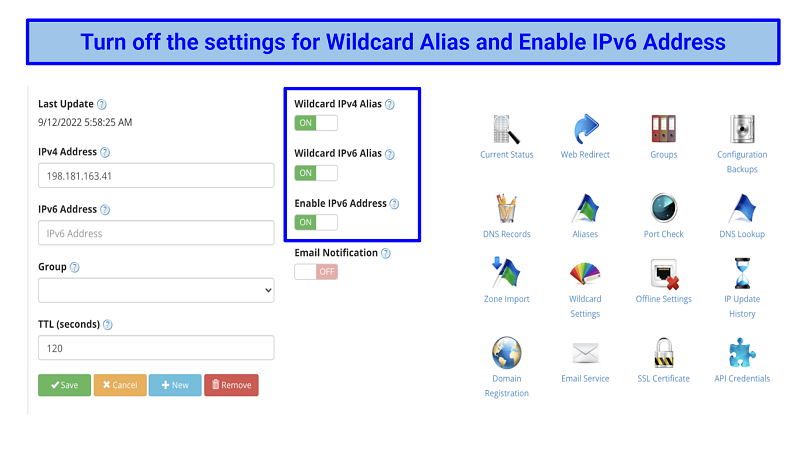 If you’re a more advanced user, the Wildcard Alias feature allows you to use sub-domains on demand
Register Your Hostname With ExpressVPN
Step 1: Go to the ExpressVPN website and sign in to your account.
Step 2: Choose the DNS Settings, scroll down to the Dynamic DNS Registration, and enter the hostname you created with the Dynu service.
Step 3: Click the Save Hostname button, and the word “updated” should appear on your screen.
Configure DNS on Your Apple TV
Step 1: Go to the My offers tab on the ExpressVPN page.
Step 2: Click Set Up ExpressVPN.
Step 3: Select Apple TV and copy the DNS server IP shown on the screen's right side.
Step 4: Turn on your Apple TV, choose Settings from your home screen, and select Network.
Step 5: Under the connection, you should see either “Wi-Fi” or “ethernet” — click the one that appears.
Step 6: Go to Configure DNS > Manual and copy the displayed DNS address (it’s recommended to save it as you might need it in the future).
Step 7: Enter the 12-digit DNS server IP address you copied from the ExpressVPN website and click Done.
Step 8: Restart your Apple TV (select System > Restart in your settings menu).
Step 9: You’re ready to safely stream your favorite shows on your Apple TV from anywhere.
3. Set Up ExpressVPN on Apple TV Using Your PC (Virtual Router)
Using a virtual router is a smart way to set up the VPN. Thanks to this method, ExpressVPN works on Apple TV through a hotspot connection. However, one downside is that you must keep your computer running while using Apple TV (smartphones can’t be used for this).
Step 1: Use a Windows/macOS computer and turn on the mobile hotspot. Windows users need to choose the OpenVPN protocol, while Mac users have to use L2TP/IPsec.
 You can turn on the WiFi hotspot using the quick settings panel on Windows
Step 2: Configure the network by assigning it a name and password.
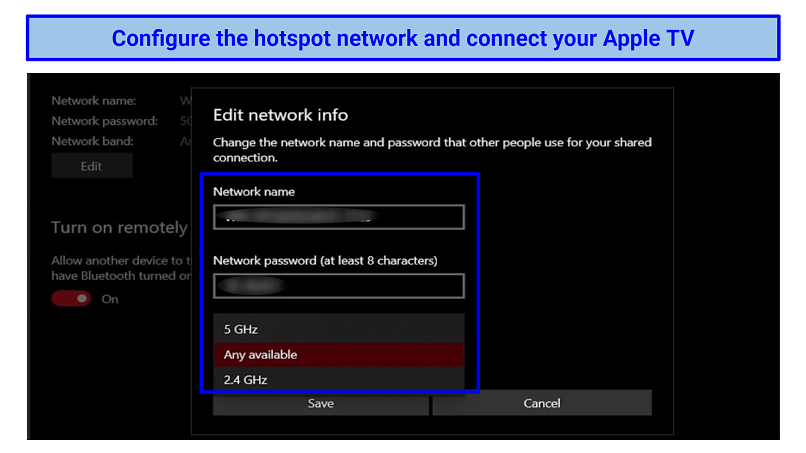 Customize the network name and frequency band for faster speeds or better range
Step 3: Connect to an ExpressVPN server on your PC.
Step 4: Turn on your Apple TV and connect to the hotspot connection you’ve just made.
Step 5: Enjoy watching your favorite shows in HD.
4. Set Up ExpressVPN on Apple TV Using AirPlay
For Apple users with Mac or iOS/iPadOS devices, there is another alternative to get ExpressVPN for your Apple TV. AirPlay is a feature that helps you mirror content from one device to another.
This way, you can stream videos from your Apple devices and cast them on your Apple TV. The latest version of tvOS lets you watch YouTube videos in 4K (running on the Apple TV 4K). Just bear in mind that AirPlay doesn’t work with Netflix, as the service has removed support for it. If you want to watch Netflix without interruptions, run ExpressVPN on your router or use smart DNS.
To utilize ExpressVPN with AirPlay on Apple TV, adhere to the instructions provided below.
Step 1: Sign up for ExpressVPN and download the app for your OS device.
Step 2: If you use Mac, open the ExpressVPN app and choose Preferences > General. To make sure your Mac can discover Apple TV, tick the “Allow access to devices on the local network” setting.
Step 3: Connect to a VPN server that lets you safely access the content you need. Then, open a streaming platform on your device and start a video.
Step 4: Click the AirPlay icon and select your Apple TV — make sure your device and Apple TV are connected to the same WiFi network.
Step 5: The selected video should be visible on your Apple TV.
FAQs on Using ExpressVPN on Apple TV
How do I change ExpressVPN’s server location on Apple TV?
The easiest way to change countries on Apple TV is through the router app or PC. Routers can be configured differently and may require additional steps to change the server location. Take a look at our setup guide to get the VPN on your router and change ExpressVPN’s locations on Apple TV.
If you’re using MediaStreamer (Smart DNS), you can’t change your server location natively. MediaStreamer has a specific list of compatible streaming services. To choose a country, go to Settings > General > Apple TV Language. Then go to General > Region Format and select the desired region.
Is there a difference between Apple TV and Apple TV+?
Usually, this refers to two different things. An Apple TV device (often just referred to as “Apple TV”) is a media box that plugs into your TV, effectively turning it into an entertainment center. You can install various apps and stream content.
Apple TV+ (or “Plus”) refers to Apple’s own streaming service. This is, of course, available on Apple TV, smart TVs, and other iOS devices. It’s also available to view in a web browser, meaning you can also watch it on a Windows or Android device.
Can I watch American Netflix on Apple TV with ExpressVPN?
Yes, you can safely watch Netflix US on Apple TV with ExpressVPN. All you need to do is follow the step-by-step guide and set up ExpressVPN on your Apple TV.
Why is ExpressVPN not working with Apple TV?
There may be multiple reasons why ExpressVPN is not working with Apple TV. However, there are a few main ones to check first. See if your router IP address is registered on ExpressVPN’s website. Select “Register my IP address” and set up ExpressVPN on your router again.
If you’re using MediaStreamer, verify if the streaming platform you want to access is supported. There may be some platforms that MediaStreamer doesn’t work with. In this case, you must manually connect to a server and use ExpressVPN on Apple TV through a router. If you use AirPlay, make sure your Apple TV is connected to the same network as your phone or laptop.
Can I use a free VPN on Apple TV?
You can, but using a free VPN for Apple TV can put your privacy at risk. Free services don’t provide robust security and privacy features like their premium counterparts. Some have also been known to sell your personal data to third parties. So, a premium VPN with a reliable money-back guarantee is a safer choice.
Even if you find a free service compatible with Apple TV that doesn’t leak your data, you can face many other limitations. Free VPNs restrict your speeds, bandwidth, and server locations pushing you to upgrade to a paid option.
Start Using ExpressVPN on Apple TV Now
Properly following the appropriate guide makes installing ExpressVPN on Apple TV a straightforward process. There are multiple methods available to utilize ExpressVPN on Apple TV, such as configuring it on your router or employing the MediaStreamer option. However, it is essential to ensure that you have an active VPN offer before proceeding with the setup on your Apple TV.
About the Author
Husain Parvez is a Cybersecurity Researcher and News Writer at The How To Guide, focusing on VPN reviews, detailed how-to guides, and hands-on tutorials. Husain is also a part of the The How To Guide Cybersecurity News bulletin and loves covering the latest events in cyberspace and data privacy.


Please, comment on how to improve this article. Your feedback matters!